Zero Adjustment in Absolute Pressure Transducer Calibration
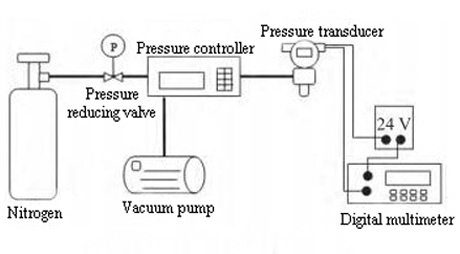
This article will introduce the method of zero adjustment for the absolute pressure transducer. Verification and calibration are performed using a pressure controller in conjunction with a mechanical pump. In the actual use of the absolute pressure transducer, due to environmental factors, human factors, etc. there will often be zero drift. Therefore, zero calibration is often required when calibrating the absolute pressure transducer.

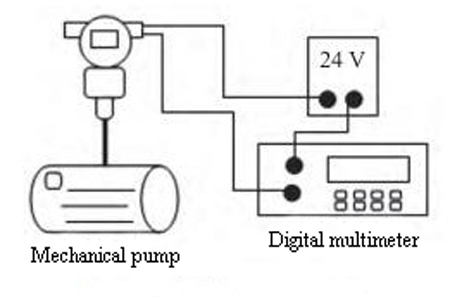
In order to ensure that the zero absolute pressure of the absolute pressure transducer is as small as possible, one method is to vacuumize the transducer directly with a vacuum pump. As shown in following figure.

The method can avoid the influence of excessive gas path and leakage of the controller on the vacuum degree of the mechanical pump. When the output current is constant, it can be considered that the pressure is stable at the limit pressure point of the vacuum pump. The zero adjustment can be made at this time. The method avoids the influence of unnecessary leakage of the system on the vacuum degree. However, since the system connection line is thin and short, it is difficult to stabilize the vacuum degree, and the real-time vacuum value of the system cannot be displayed. Therefore, this method cannot be used during the calibration process in practical applications.
2. Molecular pump-mechanical pump two-stage pumps vacuum system for absolute pressure transducer zero adjustment
To solve the above problem, based on the vacuum calibration, the molecular pump-mechanical pump two-stage pumps vacuum system can be used to realize the zero adjustment and low value reading for the absolute pressure transducer.
The tested absolute pressure transducer can be vacuumized after installation. Turn on the mechanical pump and corresponding valves. After the low vacuum gauge shows less than 20 Pa, open the solenoid valve and start the molecular pump. When the low vacuum gauge shows 0.1Pa or less, turn on the high vacuum gauge to check the vacuum. The device combines the vacuum metering method to realize the conversion of the mechanical pump and the molecular pump, and displays the vacuum degree of the system in real time. In this way, the zero adjustment for the pressure transducer under low vacuum is completed.

- Calibration steps of the measurement error items for absolute pressure transducer
- Before the verification, adjust the output lower limit and the upper limit by changing the input pressure to be consistent with the theoretical lower limit and upper limit. It can usually be done by adjusting the zero and full scale. In daily calibration work, due to the limitations of the equipment, the zero adjustment for the absolute pressure transducer can only be performed with a vacuum of 50 kPa as the absolute zero point.
- The process of adjusting the same series of absolute pressure transducers with different ranges. When adjusting the large-scale absolute pressure transducer in the same way, the unconventional measurement error meets the accuracy requirement, and the linearity is standard. Among them, the large-scale absolute pressure transducer generally refers to its range greater than atmospheric pressure. However, for small-range absolute pressure transducers, the linearity and accuracy often do not meet the requirements. Among them, the small-range absolute pressure transducer generally refers to the range less than atmospheric pressure.
- Take an absolute pressure transducer with level 0.1 accuracy and measuring range of 0-100 kPa as an example. In the calibration of such a large-scale absolute pressure transducer, when the system draws a vacuum of 50 Pa, the theoretical output current of the absolute pressure transducer is 4.008 mA. If this value is used as the absolute zero point, adjust the absolute pressure transducer output value to 4 mA. Then pressurize to an absolute pressure of 100 kPa and adjust the output value to 20 mA. After the calibration is successful, calibrate the output value according to the verification procedure, and the measurement error and linearity are all meet the requirements. According to the analysis, for an absolute pressure transducer with 0.1-level accuracy, range of 0-100 kPa, and output signal of 4-20 mA, the maximum allowable error of the output is 0.016 mA.
-
When use the vacuum system make the zero adjustment for absolute pressure transducer, the 0.008 mA rounded off is within its error tolerance. Therefore, zero with 50 Pa absolute pressure as absolute zero will not affect the linearity of the transducer. However, for small-range absolute pressure transducers, take an absolute pressure transducer with 0.1 level accuracy and measuring range of 0-40 kPa as an example. During the verification process, the theoretical output of the absolute pressure transducer is 4.020 mA when the pressure is stabilized at 50 Pa absolute. This current value is greater than the maximum allowable error 0.016 mA of the absolute pressure transducer. Therefore, the current value that is rounded off during zero will affect its measurement error, resulting in the measurement error of the absolute pressure transducer is out of tolerance. In addition, the absolute pressure at zero point of the absolute pressure transducer should be as small as possible. The resulting error should not exceed 1/20-1/10 of the allowable error. For the absolute pressure transducer with 0.1 level accuracy, 4-20 mA output signals, the allowable error is ±0.016 mA. Therefore, the error caused by zero absolute pressure should not exceed ± (0.0008-0.0016) mA.
- Solution for zero adjustment in absolute pressure transducer calibration
In order to ensure that the zero absolute pressure of the absolute pressure transducer is as small as possible, one method is to vacuumize the transducer directly with a vacuum pump. As shown in following figure.

The method can avoid the influence of excessive gas path and leakage of the controller on the vacuum degree of the mechanical pump. When the output current is constant, it can be considered that the pressure is stable at the limit pressure point of the vacuum pump. The zero adjustment can be made at this time. The method avoids the influence of unnecessary leakage of the system on the vacuum degree. However, since the system connection line is thin and short, it is difficult to stabilize the vacuum degree, and the real-time vacuum value of the system cannot be displayed. Therefore, this method cannot be used during the calibration process in practical applications.
2. Molecular pump-mechanical pump two-stage pumps vacuum system for absolute pressure transducer zero adjustment
To solve the above problem, based on the vacuum calibration, the molecular pump-mechanical pump two-stage pumps vacuum system can be used to realize the zero adjustment and low value reading for the absolute pressure transducer.
The tested absolute pressure transducer can be vacuumized after installation. Turn on the mechanical pump and corresponding valves. After the low vacuum gauge shows less than 20 Pa, open the solenoid valve and start the molecular pump. When the low vacuum gauge shows 0.1Pa or less, turn on the high vacuum gauge to check the vacuum. The device combines the vacuum metering method to realize the conversion of the mechanical pump and the molecular pump, and displays the vacuum degree of the system in real time. In this way, the zero adjustment for the pressure transducer under low vacuum is completed.

