Pressure Sensor Installation Position Affect Measurement Result
In a system that uses an indirect method to measure the mass and flow rate of steam using a mass flow meter, the steam density is generally determined based on steam pressure and temperature. Due to the different installation positions of the pressure sensor, the condensed water in the pressure tube is different. What is the impact of this situation on flow measurement and how to deal with it?
In the pressure measurement for the steam, there will be a certain difference between the pressure measured by the pressure sensor and the actual steam pressure due to the gravity of the condensed water in the pressure guiding tube.
For example, in a working condition where the fluid common pressure is equal to 0.7 MPa (gauge pressure) and the common temperature is equal to 250 ℃(ie, superheated steam), the pressure measurement value is 58.7 kPa higher. For differential pressure flow meter, it will introduce an error of 3.69% R. For vortex street flowmeter, it will introduce an error of 7.52% R.
In the saturated vapor condition where the fluid common pressure is equal to 0.7 MPa, the pressure measurement is 58.7 kPa higher. For differential pressure flow meter, it will introduce an error of 3.42% R. For vortex street flowmeter, it will introduce an error of 6.95% R.
Therefore, the effect of the liquid column height in the pressure sensor's pressure tube on the pressure measurement must be corrected.
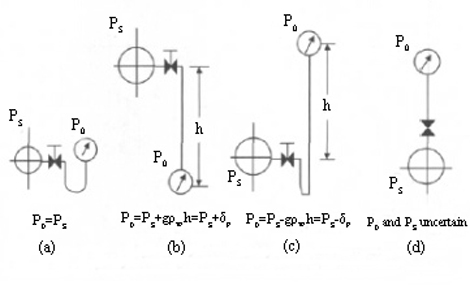
In the figure, the pressure sensor of state (b) is below the pressure tapping point. If the pressure pipe is filled with condensate, the indication pf the pressure sensor is higher and the higher value is gρwh. Assuming h=6m, g is 9.806665 m/s2, and Pw is 998.2 kg/m3 (assuming liquid temperature is 20 ℃), then the influence on the pressure sensor is 58.7 kPa.
For state (c), the pressure sensor is above the pressure tapping point. If the pressure pipe is fully vented and the pressure pipe is filled with condensate, the effect on the sensor is -gρwh. For the state (d), since the height of the condensate in the pressure guiding tube is difficult to determine, it is difficult to determine how low the output value of the pressure sensor it is. Therefore, this method should not be used.

1. Correction in the secondary table
The secondary table mentioned here is generalized, including not only the ordinary flow secondary table, but also DCS, PLC, intelligent regulator, etc., but the correction methods are the same. The user can make corrections with the secondary table according to the requirements and in accordance with product manual.
2. Correction in pressure sensor
The essence of this correction method is zero-point migration for the pressure sensor. In the above example, if the measurement range of the pressure sensor is 0~1.0 MPa, the measurement range becomes -58.7~1.0MPa after the zero point migration for -58.7kPa.
In field operation, the measurement range can be set to 58.7-1058.7 kPa using a hand-held terminal. For a normal pressure sensor, in the condition where the sensor's pressure input is connected to the atmosphere, migrate the output to 3.0608 mA with the. This method usually requires corresponding modifications to the design files and device cards, and the steps are cumbersome. Moreover, if the amount of migration is large, it is difficult to achieve for most pressure sensors. If conditions permit, a secondary table can be used for correction.
In the pressure measurement for the steam, there will be a certain difference between the pressure measured by the pressure sensor and the actual steam pressure due to the gravity of the condensed water in the pressure guiding tube.
- Influence of pressure sensor measurement error on flow indication
For example, in a working condition where the fluid common pressure is equal to 0.7 MPa (gauge pressure) and the common temperature is equal to 250 ℃(ie, superheated steam), the pressure measurement value is 58.7 kPa higher. For differential pressure flow meter, it will introduce an error of 3.69% R. For vortex street flowmeter, it will introduce an error of 7.52% R.
In the saturated vapor condition where the fluid common pressure is equal to 0.7 MPa, the pressure measurement is 58.7 kPa higher. For differential pressure flow meter, it will introduce an error of 3.42% R. For vortex street flowmeter, it will introduce an error of 6.95% R.
Therefore, the effect of the liquid column height in the pressure sensor's pressure tube on the pressure measurement must be corrected.
- The influence of the liquid column height in the pressure sensor's pressure tube on the pressure measurement
In the figure, the pressure sensor of state (b) is below the pressure tapping point. If the pressure pipe is filled with condensate, the indication pf the pressure sensor is higher and the higher value is gρwh. Assuming h=6m, g is 9.806665 m/s2, and Pw is 998.2 kg/m3 (assuming liquid temperature is 20 ℃), then the influence on the pressure sensor is 58.7 kPa.
For state (c), the pressure sensor is above the pressure tapping point. If the pressure pipe is fully vented and the pressure pipe is filled with condensate, the effect on the sensor is -gρwh. For the state (d), since the height of the condensate in the pressure guiding tube is difficult to determine, it is difficult to determine how low the output value of the pressure sensor it is. Therefore, this method should not be used.

- Correction of liquid column height influence
1. Correction in the secondary table
The secondary table mentioned here is generalized, including not only the ordinary flow secondary table, but also DCS, PLC, intelligent regulator, etc., but the correction methods are the same. The user can make corrections with the secondary table according to the requirements and in accordance with product manual.
2. Correction in pressure sensor
The essence of this correction method is zero-point migration for the pressure sensor. In the above example, if the measurement range of the pressure sensor is 0~1.0 MPa, the measurement range becomes -58.7~1.0MPa after the zero point migration for -58.7kPa.
In field operation, the measurement range can be set to 58.7-1058.7 kPa using a hand-held terminal. For a normal pressure sensor, in the condition where the sensor's pressure input is connected to the atmosphere, migrate the output to 3.0608 mA with the. This method usually requires corresponding modifications to the design files and device cards, and the steps are cumbersome. Moreover, if the amount of migration is large, it is difficult to achieve for most pressure sensors. If conditions permit, a secondary table can be used for correction.

